Walk around your home after Regina's snow melts and you might notice something troubling between the bricks — sandy powder where solid mortar used to be, fine cracks tracing the joint lines, or patches of white crust on the wall face. These aren't cosmetic quirks. They're your home telling you that its first line of defence against our brutal Saskatchewan winters is starting to fail.
Mortar is the “glue” between your bricks — but it's more than that. A properly bonded joint seals out moisture, distributes the load of the wall evenly, and keeps your brickwork rigid and weathertight. When mortar fails, water finds its way in. And in Regina, water plus freezing temperatures is a wrecking combination that compounds with every passing winter.
The good news: failing mortar gives you clear, visible warnings before it becomes a structural problem. This guide walks you through every sign to look for, explains why Regina's climate accelerates the damage, and tells you exactly when to pick up the phone and call a masonry professional.
Why Regina's Climate Is So Hard on Brick & Mortar
Saskatchewan is one of the most demanding climates on the continent for masonry. Our winters bring prolonged cold, blowing snow, and — crucially — repeated freeze-thaw cycles where temperatures hover above and below zero for days at a time.
This cycle doesn't just affect old homes. Even well-built brick structures experience gradual joint erosion as mortar — typically a blend of cement, lime, and sand — loses its binding strength over 20–30 years. Once joints erode beyond a critical threshold, the rate of damage accelerates dramatically. A small crack in October can become a crumbling, water-saturated joint by April.
Wide temperature swings also cause thermal movement: brick expands in summer heat and contracts in winter cold at a different rate than other building materials, producing the characteristic step cracks at corners and vertical cracks above doors and windows that Regina homeowners often notice in spring.
7 Clear Signs Your Mortar Is Failing
You don't need a mason's eye to spot these warning signs — just a bright day, a careful walk around your home, and this checklist. Pay extra attention to chimneys, brick steps, garden walls, and the north-facing sides of your home, which stay damp and frozen longer.

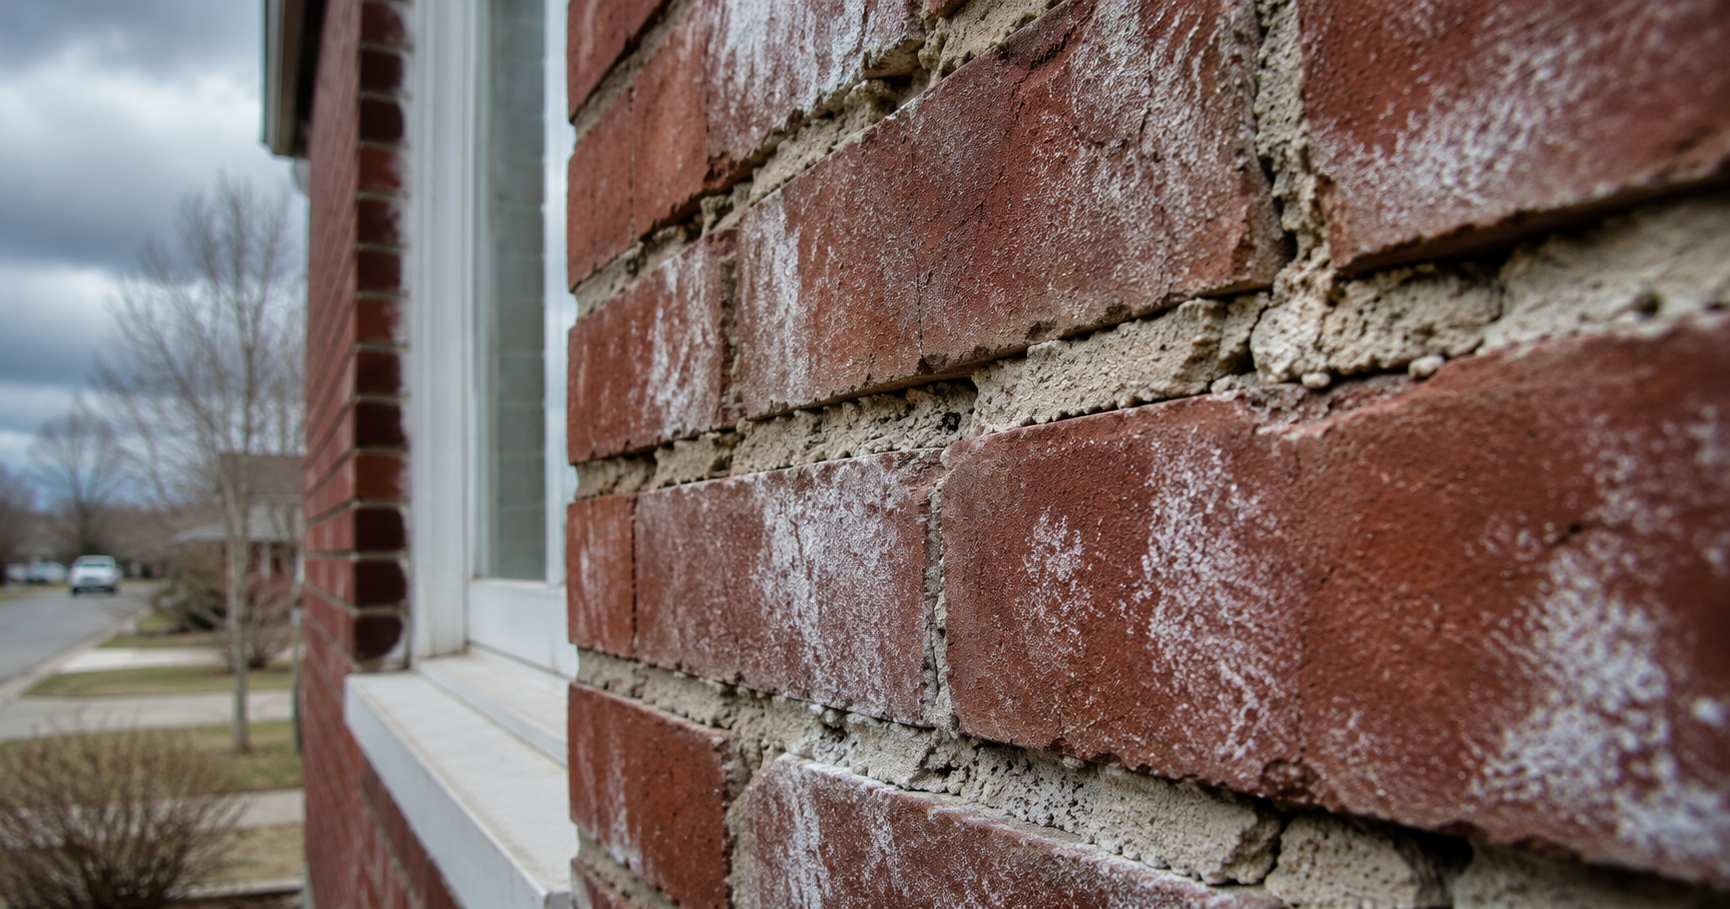
Run your finger across a mortar joint. Does it feel sandy or powdery? Can you scrape it away with a coin or your fingernail? Mortar in this state has lost its binding strength entirely. It is no longer waterproofing your wall — it is functioning as a sponge.
Mortar that has eroded more than about ¼ inch back from the brick face is a red flag. At that depth, water pools in the recess rather than draining away, accelerating damage. Look for shadows between bricks in raking sunlight — they reveal recessed joints clearly.
Hairline cracks, stair-step cracks following the brick pattern, or horizontal cracks running along a single course all signal that freeze-thaw movement or settlement stress has fractured the joint. Cracks that visibly widen each winter are especially urgent.
A brick that shifts under gentle hand pressure, tilts out of plane, or sounds hollow when tapped has lost its mortar bond entirely. On chimneys and stairs, loose masonry is a safety hazard, not just a cosmetic issue — loose treads and caps can fall.
When water penetrates through weak mortar and freezes inside the brick itself, it forces the face of the brick to pop off in layers or flakes — this is called spalling. Exposed, pitted brick surfaces and chunks missing from brick corners are classic winter damage indicators in Saskatchewan.
That chalky white crust on your brick is efflorescence — mineral salts left behind as water moves through the masonry and evaporates on the surface. It doesn't damage the brick directly, but it tells you water is regularly travelling through your joints. If it keeps coming back after cleaning, your mortar is the entry point.
Dark, wet patches on the inside of an exterior brick wall, bubbling or peeling paint near a chimney, musty odours in a basement with brick walls — all point to water infiltrating through failed mortar joints and working its way into your living space.
“In Saskatchewan, water plus freezing temperatures is the enemy. Once moisture gets into a weak joint, every freeze-thaw cycle pries the mortar apart a little more — until one spring you've got a serious problem on your hands.”
— Regina Masonry ProfessionalsWhere to Look First: High-Risk Areas on Your Home
Not all brick surfaces wear equally. Some locations take more punishment from moisture, wind, and temperature swings than others. Prioritize these areas in your annual walk-around:
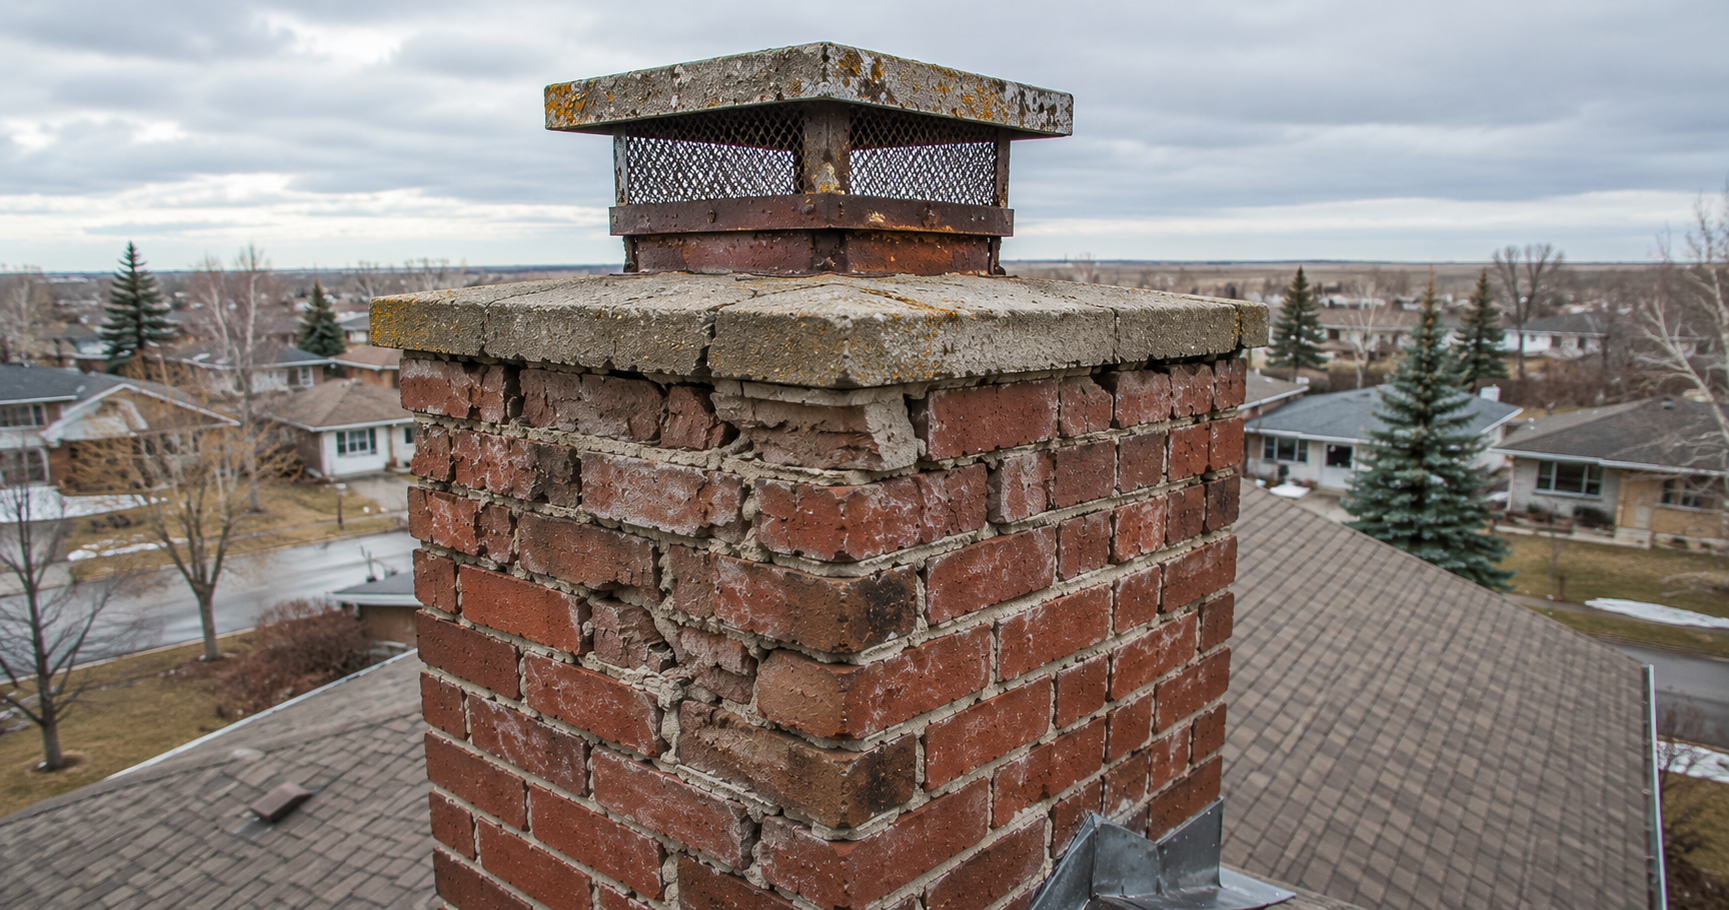
Chimneys
Chimneys are the single most vulnerable masonry structure on a Regina home. Exposed on all four sides to wind, rain, and snow, with no roof overhang for shelter, chimney mortar typically fails first. Check the crown (the cement cap on top), the flashing where the chimney meets the roof, and every visible joint face.
Brick Steps & Retaining Walls
Steps hold standing water, allow repeated foot traffic, and have joints that face directly upward — the worst possible orientation for water accumulation. Watch for loose treads, soft or sandy joints in the risers, and any tilting. Retaining walls carry soil pressure on top of freeze-thaw stress; bowing or leaning sections need immediate attention.
North-Facing Walls
The north side of your home stays in shade the longest, stays frozen the longest, and dries out the slowest. Mortar on north-facing exterior walls tends to deteriorate faster than the south or west elevations. Check carefully and look for dark damp patches that persist long after a rain or snowmelt.
Around Windows, Doors & Lintels
The metal or concrete lintels (horizontal supports) above windows and doors expand and contract at a different rate than brick, causing stress cracks in the surrounding mortar. Water channels down brick from above and collects at the sill — common entry points for infiltration.
When to Stop Watching and Call a Masonry Professional
Minor surface wear and faint hairline cracks can be on a monitoring list. These signs below cannot — they indicate active structural risk or ongoing water infiltration that will worsen with every rainfall and every freeze.
- Mortar missing deeper than ¼ inch between bricks on any exterior wall
- Loose, wobbling, or visibly tilted bricks — especially on chimneys, stairs, or retaining walls
- Efflorescence or damp interior spots that return within weeks of cleaning or repainting
- Visible bowing, sagging, or leaning sections of wall after a tough winter
- Interior moisture damage, bubbling paint, or musty odours near a brick wall or chimney
- Step cracks or diagonal cracks spreading across multiple brick courses
- Any spalling on a chimney crown, cap, or top courses
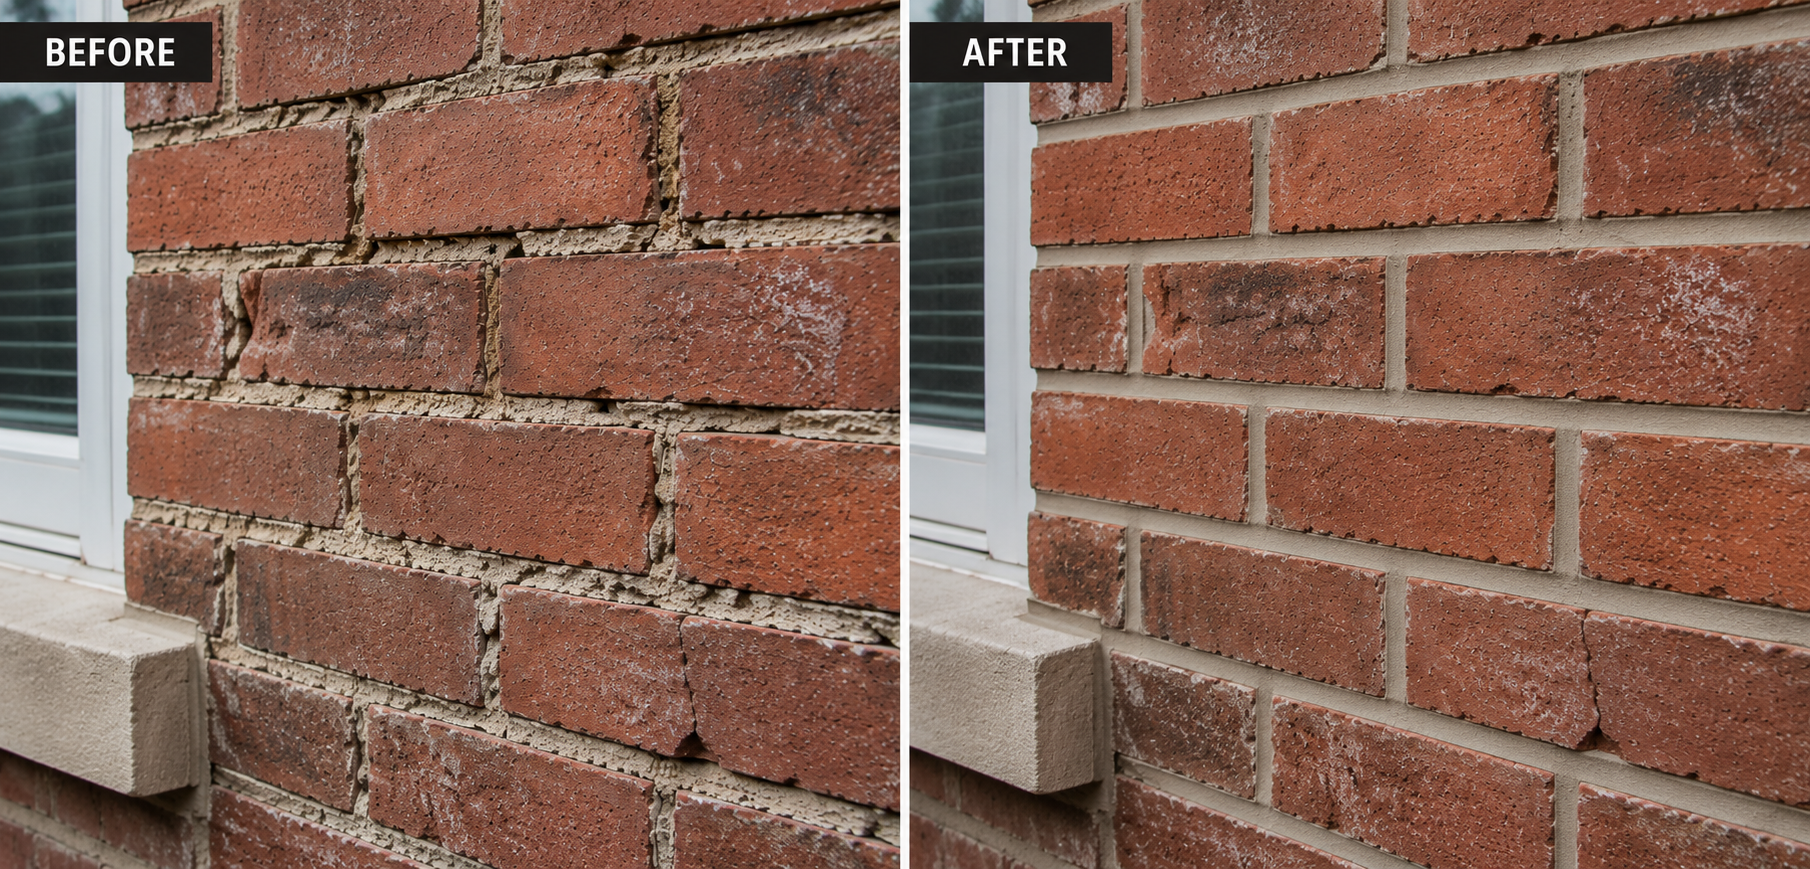
Many of these issues are fully repairable with professional repointing (also called tuckpointing) — the process of removing deteriorated mortar to a proper depth and packing in fresh, matched mortar. Caught early, repointing is straightforward and cost-effective. Left to another winter, the same wall may need partial or full rebuilding.
Best Time of Year to Inspect & Repair Mortar in Regina
Masonry repair in Saskatchewan is very weather-dependent. Mortar requires specific temperature ranges — generally above 5°C and below 32°C — and enough dry time to cure properly. In winter, contractors can work, but they must tent the area, use heating equipment, and add cold-weather admixtures, all of which add cost and complexity.
Our recommendation for Regina homeowners:Do a visual inspection in April or May once snow is fully gone and damage is visible. Book your masonry contractor for late summer or early fall — you'll get the best quality work at the most competitive price, and your home will be sealed before the first hard freeze of the new season.
DIY Mortar Repair vs. Hiring a Professional: Know the Difference
Small, isolated areas of soft mortar in a single joint on a ground-level wall? A homeowner comfortable with hand tools and patience can tackle surface repointing as a weekend project. Hardware stores carry pre-mixed repointing mortars, and there are good instructional resources available.
However, there are critical mistakes that DIY repointing often makes:
- Wrong mortar type. Modern high-strength Portland cement mortars are often too hard for older Regina homes built with softer brick. When the mortar is stiffer than the brick, the brick faces crack and spall under stress — the opposite of what you want. A professional matches mortar hardness, colour, and composition to the existing wall.
- Inadequate joint preparation. Effective repointing requires grinding or chiselling the old mortar out to a minimum depth of ¾ to 1 inch. Applying new mortar over surface powder gives a patch that falls out within a season.
- Missing the root cause.If mortar is failing because of poor flashing, blocked weep holes, or a missing drip edge above a window, repointing the joints won't stop the damage — water will find the same entry points again.
For any work on chimneys, structural walls, retaining walls, or widespread joint failure covering multiple sections of your home, always hire a licensed masonry contractor. The cost of professional repointing is a fraction of the cost of rebuilding a chimney or a collapsing retaining wall.
Frequently Asked Questions
Worried About Your Mortar? Get a Free Inspection.
Our team has been assessing and repairing brick mortar across Regina and Saskatchewan for years. We'll tell you exactly what you're dealing with — no pressure, no upselling.
Book Your Free Masonry Inspection →